
Index
- Introduction
- Account Creation/Setup
- Activation
- User Panel
- Excel Connector Setup
- Opt-In Tables
- How to uninstall the app
- Beta API's
- Mac Users
- Data Sync
- Data Security
Introduction
The Datawarehouse.io Excel Integration enables business analysts and decision-makers to seamlessly connect different data sources to Excel, replacing manual exports with automated data syncs and schema replication from Azure SQL—making reporting and data exploration faster and easier.
Account Creation/Setup
- Create an account at app.datawarehouse.io
- Select the Excel Connector on the dashboard or in the left-hand menu.
- Click the Start Free Trial button.
- You will be re-directed to a page labeled Select Initial Data Source. Here, you will select which data source to link to the Connector app.
- From there, select the refresh rate that you want your data to sync into Excel Connector database.
- You are then re-directed to the checkout screen. Please fill out all required information in order to activate your service.
- Success! You are all signed up and can now visit the Excel Connector section of the app to view your connector details.
- Continue to the Excel Connector Setup Guide for how to plug the app into Microsoft Excel.
Activation
Once you have successfully signed up, we will activate your app. Upon activation, an email with your connector details will be sent to you. You can also retrieve them from the User Panel.
User Panel
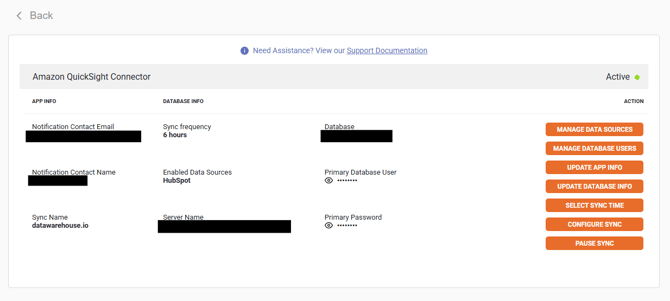
You can visit the User Panel to perform the following self service administrative actions for your Connector database.
Below are the primary functions of the selections found in your user panel:
- Manage Data Sources
- You can add and manage additional data sources such as LinkedIn Ads and Google Ads to be included in the Connector dataset (see Manage Data Sources subsection below form more details).
- Manage Database Users
- You can add and manage additional database users by clicking on and using this feature here (see Manage Database Users subsection below for more details).
- Configure Sync
- You can set up the sync to only sync over the data you need using this feature by removing specific tables and fields/columns from the sync (see Sync Configuration subsection below for more details).
- Update App Info
- You can assign/reassign the primary user of the database by clicking on this button and making the necessary adjustments by inputting the information in the pop-up window as shown in the example below.

- Update Database Info
- You can change the name of the database and the primary username of the database here.

-
Pause Sync
- You can pause and un-pause the sync at any time using this feature.
- Please note: This does not pause the billing for your subscription. It only pauses the sync between your data sources and your Connector database.
- You can pause and un-pause the sync at any time using this feature.
- Select Sync Time
- Here, you can adjust your sync times as needed by opening the interface as shown in the example below.
- Please note: This feature is only available to users on the 6-hour refresh rate plan or higher.

How to access the user panel
To access the user panel, please review the following instructions:
-
Log into your Datawarehouse.io account at https://app.datawarehouse.io/.
- Select your Connector app from the My Apps section of the main dashboard page.

-
On the app details page, click on the sync name entry under the Sync Name column to open the management window for your sync. This will take you to your user panel.

Sync Configuration
The Sync Configuration feature allows users to select and deselect which pieces of data they wish to have synced from their data sources.
-
Users can use this feature to suppress and remove any tables or specific fields/columns/properties that are currently synced into their database that they do not need or are not currently using.
-
Suppressing properties and tables will not remove those pieces of data from your data source. Suppressing properties or tables excludes them from future syncs and removes the corresponding data from the database that the Datawarehouse.io app syncs to.
-
-
The Sync Configuration feature can also be used to define the oldest data date for data in supported tables. Please note: Some tables cannot be filtered by oldest data date.

To learn how to locate and use this feature, please review the following help documentation linked below.
Manage Database Users
Additional users can be added and managed to your connector database with the Datawarehouse.io app, allowing additional users to access the database without needing to share the primary user credentials.

To learn how to add and manage additional users for your database, please review the linked documentation below:
Manage Data Sources
To manage your data sources, click the Data Sources button in the user panel interface.
For more details about what data sources are available, as well as how to add, remove, and alter existing data sources for your connector please visit the support guide linked below.

Excel Connector Setup
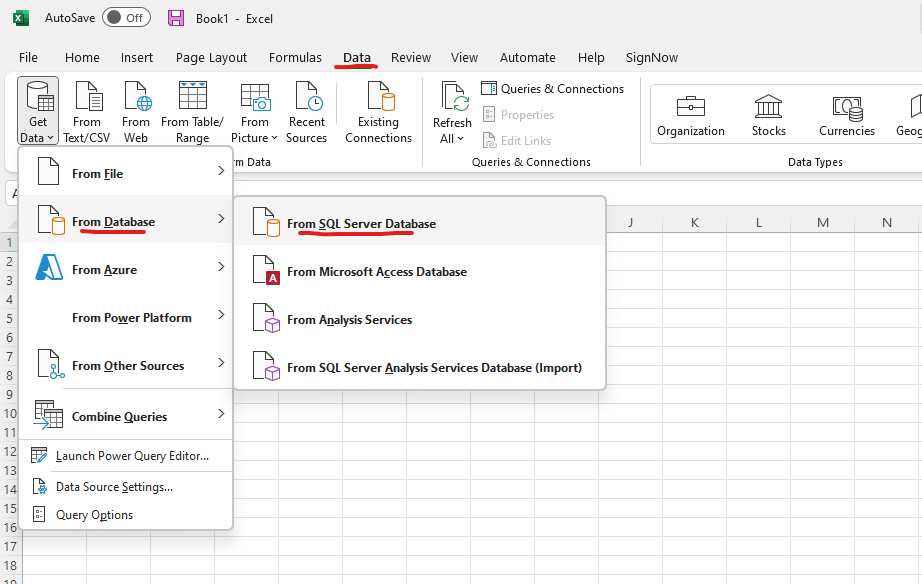
When you open a new or existing Excel document and want to use the Connector, please select the "Data" tab at the top of the screen, and then select the Get Data button. Select "From Database" and "From SQL Server Database"
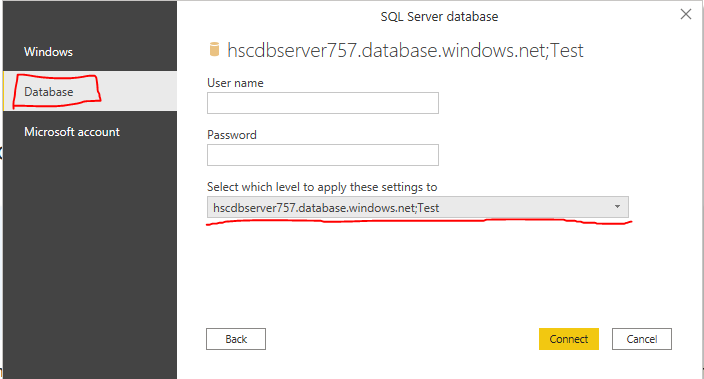
You will then Enter the Server information and database provided to you via your activation email and click "OK." The "Database (optional)" field below is not actually optional so please enter the database name provided to you by our app.

Once you input your server and database and click "Ok", you will be prompted to enter your username and password. You MUST select the database option on the left before entering your username and password. Then select your database as the level to apply those settings too. It is critical you select the "Select which level to apply these settings too" and select your database and not just the server. It should look like the format below.
After following the instructions above, you will now be able to pull any data tables currently hosted inside your SQL server.
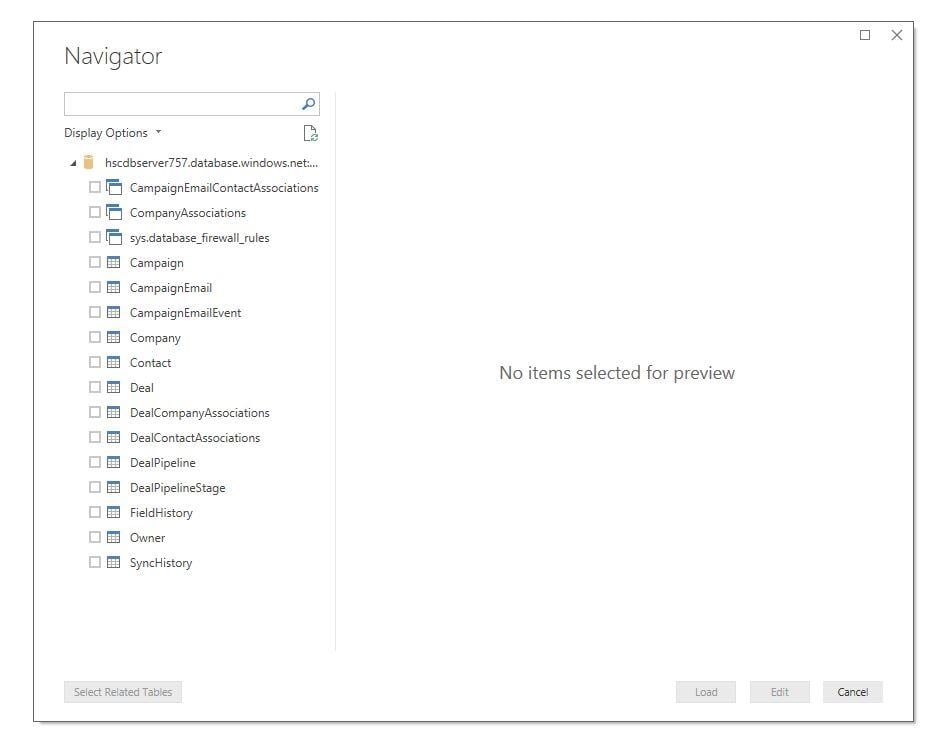
Select the Checkboxes for the tables you want to create reports on and click "Load". It may take a moment depending on the size of your database and the tables you select. Then all of your tables will we able to be loaded into Excel.
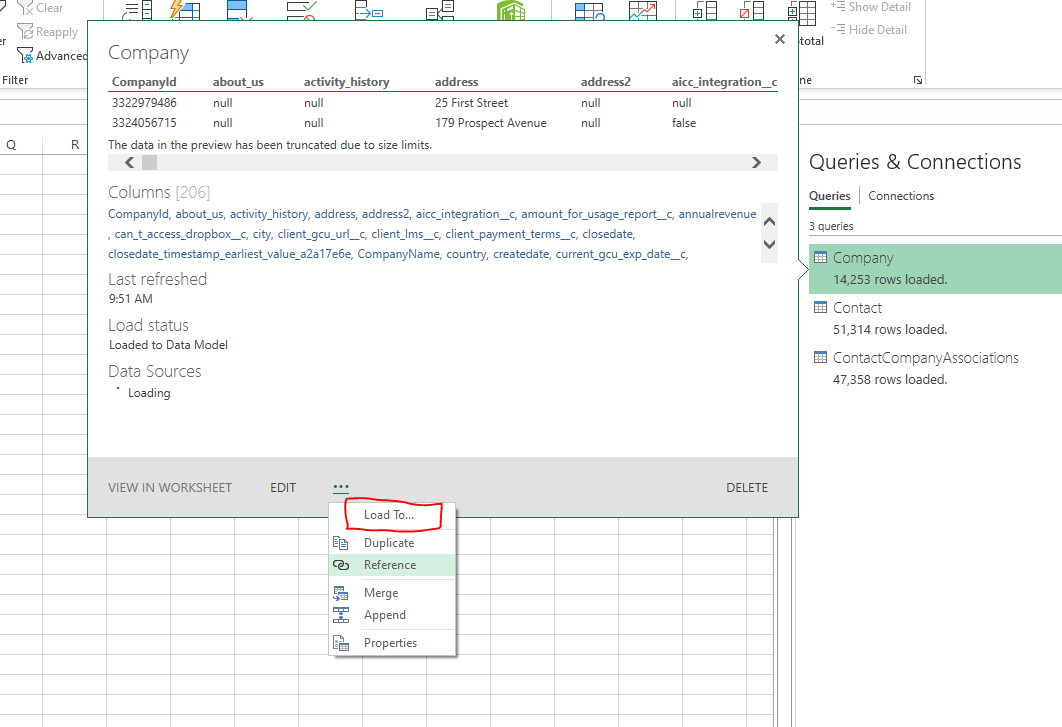
In the "Queries and Connections" tab, you can scroll over a table, click the three dots, and load it to a workbook or tab. You can also merge and append the tables together.
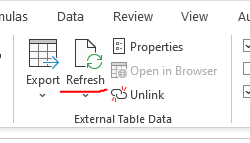
Whenever you need to refresh your data, click the refresh button located under the "Table Design" section or the "Data" section in the top level menu.
If you need to schedule a refresh. This guide by Microsoft explains the various ways that you can do that. You will have to determine which is the best method for your use case.
Opt-In Tables
The following tables are available for opt-in as they tend to be larger, advanced data sets and can take up a significant amount of storage and API Calls. You can submit a support request with your database name at https://datawarehouse.io/opt-in-data-types/ or email us directly with your database name at help@datawarehouse.io to ask for these to be enabled. There is no additional cost to enable these tables.
- ContactWebEvents
- CustomEvent
- ContactSubscriptionType
- ChatflowThread
- ChatflowMessage
- TicketPropertiesHistory
- DealPropertiesHistory
- ContactPropetiesHistory
- CompanyPropertiesHistory
- EngagementsHistory
- CampaignContactAssociations
How to uninstall the app
For instructions on how to uninstall the Datawarehouse.io app in your data source, please review the following documentation:
*Please note this does not cancel your subscription. To do that please visit:
Beta API's
This app utilizes the following beta API's:
ChatflowThread and ChatflowMessage data tables contain Chatflows data and is powered by the beta API listed below.
https://developers.hubspot.com/docs/api/conversations/conversations
More information about beta APIs can be found in this supporting documentation.
Mac Users
Mac users will need to install the following drivers on their computer for the app to function:
Data Sync
Data syncing will be done at intervals determined by your plan.
Please allow at least 24-48 hours from activation for the initial database to be built. Once it is built it will refresh at the rate determined by your plan.
Data Security
- Only you will have "read only" access to your database. You can make changes in Excel, but they will not be reflected in your data source.
- User authentication for each data source is done using OAuth 2.0 protocol as per the best practice in industry.
- This application is GDPR Compliant
- If you have trouble accessing the database due to your internal firewall restrictions please have your IT department open outbound TCP Port 1433
- If there is information missing from a property it could be because that fields is improperly configured in its respective data source.